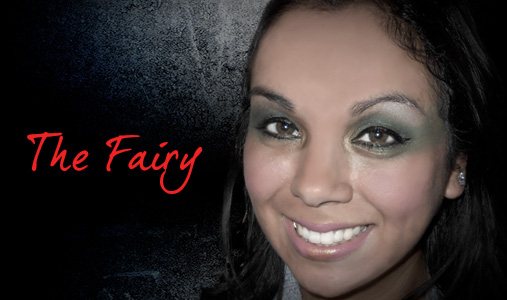
The Fairy!
Anytime I do a fairy, I love to take the shadow out onto the temple. It gives an illumination to the eyes that looks like the perfect supernatural lighting! Also, don’t be afraid to take the shadow pretty high, so that it connects naturally with the color on the temple. Lastly, I love to use a super shimmery color in the inner corner and under the brow.
Mix up the type of fairy just by changing the colors. This green would work for a woodland fairy or Tinkerbell, but switch it up with a purple or pink to match your outfit. In this case matching your eye color to your outfit is recommended rather than frowned upon!
Products used: Urban Decay Primer Potion, NYX liner in 920 Lime Green, Urban Decay Matte Shadow in Chronic and Bender and Midnight Cowgirl from the Book of Shadow IV, Urban Decay Powder Blush in Quickie, and Loreal Voluminous Carbon Black.

The Sugar Skull
I’ve noticed a lot of sugar skulls around this year for Halloween. Technically the sugar skull is part of the Dia De Los Muertos Celebration, in which Mexican families celebrate family members that has passed away through alters. This is a popular makeup worn during the celebration, but since it looks like a skull has become a popular look for Halloween this year also and is generally paired with traditional looking Mexican outfits.
My best tip for this look is to mix some very light colored foundation with the white cream makeup, as I have found it impossible to blend shadow over the white cream makeup alone. Also, to get a vibrant color on the eye, I used a Cream Shadow pencil to prep the area. The best thing about this is that once you get the basic shape, you can use whatever colors or elaboration that you want!
Products Used: White cream makeup from the Halloween section, Revlon Photoready Foundation in 004 Nude, Too Faced Liquid Lava Gloss Super Black Liner pencil, Urban Decay Hijack and Crystal from the Book of Shadows IV, Rimmel Matte Black shadow, and Loreal Voluminous Carbon Black.

The Dolly
Another popular look with the Dolly or baby doll. For this look, the key is to make your eyes look unnaturally large! I started with making my face look as flawless as possible, porcelain like. I used a ton of concealer to cover all the redness in my cheeks. Everyone does the extension of the lower lid a bit different, but I just follow the orbit of my eye on the bottom to ensure they’re even. I then took large lashes and placed then on the new lower lashline and upper lashline, added freckles and pink lips, and of course pigtails!
Products used: IT Cosmetics Bye Bye Undereye Concealer, Revlon Photoready foundation in Nude, Revlon Colorstay liner pen, generic costume lashes, NYX lip liner in Pinky, and Loreal Voluminous Carbon Black.

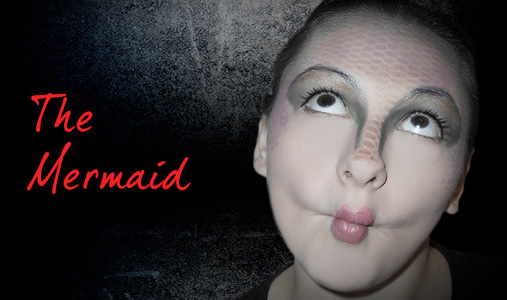
The Mermaid
There are all kinds of mermaid looks out there, but I wanted mine to look as fish-like as possible. I used a liner to draw out the shape of the eye and then used aquatic-themed colors to create the look. The most attention grabbing part is, of course, the scales on the forehead! To achieve this I used a fishnet stocking pulled over the face and stippled my shadow over it so that what was left when you removed the stockings was a scale-like design.
Products used: Revlon Photoready foundation in Nude, Revlon colorstay pen liner, Urban Decay shadows in Blue Bus, HiJacked, and Baked from the Book of Shadows IV, NYX liner in Lime Green, Loreal Voluminous Carbon Black, and a generic pair of fishnets.

The Zombie
This was my favorite of the looks, and I actually think I convinced my handsome model here to change his own costume to this, because it came out so well. I started with getting the woulds together. I had decided that he would have an open ash on his cheek and his brains coming out on his forhead. For the would I used toilet paper (which was a little thick – I think next time I’ll use tissue) and saturated it in face-safe glue. As I placed the tissue I wrinkled it up so it looked like slashed skin and I pulled a hole in the middle. For the brains, I barley wet some unflavored, unsweetened oatmeal just enough to make it sticky and mushy. I then glued that to the forehead and allowed everything to dry. Once it was all dry I used a light colored foundation and put a matte dark shadow under the eyes, following the natural lines of the eye. I also used the same shadow to shade the outer edges of the gash and around the brain spillage. I took a peach shadow and put that over the brains. Then it was blood time – I placed blood dripping out of the wounds and all down Travis’ chin, so it looked like he had been feeding. A note with the blood, it will stain, skin, clothes, everything, so be careful.
Products used: Toilet paper, oatmeal, lash glue or liquid latex, Revlon photoready, Manly palette, generic blood gel from Halloween store.
These are a few of the look I’ve created this year and I hope you can take these tricks and apply them to make your own spooky, sexy or just plain fun looks!
A quick word of thanks to all my lovely models, Christina - my fairy, Lauren - my sugar skull, Alyssa – my mermaid (and sister) and Travis – my zombie! You guys were awesome to let me paint you up for the evening.
Until Next Time, Happy Spooky Primping!
See more from Erica Jones at EricasPrimpandPolish