Index Background

Everyday Look with a Setter - Kim

by Kim September 12, 2016


Welcome back everyone its Kimberly, beauty blogger "kimkreationsp"! Today's look features these easy waves that are smooth, silky and super simple to style! You can leave them as so once done setting with the rollers or put them into a hairstyle that will still accentuate these sleek waves! The choice is yours and either way, your hair will look AMAZING! Did I mention it's super fast and easy?! Hope you enjoy!


See more from Kim on her Youtube Channel KimKreationsP


Learn more about the T|Studio Thermaluxe Setter

At-Home Blow Out Tutorial

by Jenny Gonzalez September 6, 2016


Hi everyone! My name is Jennifer Gonzalez and I'm a beauty/lifestyle vlogger from Orange County, CA. You can find some of my work on YouTube (jenniferg815). Some of my favorite topics to talk about on my channel is the latest most innovative products ranging from cosmetics and skincare to hair styling to hair care. This is why I am beyond excited to partner with Remington for this video to share with you my best tips and tricks on my perfect never fail blow out using Remington T-studio blow dryer. I hope you enjoy!!


Learn more about the T|Studio Thermaluxe Dryer

3 Different Curls from 1 Styling Tool

by Kelsey August 15, 2016


Hey Ya’ll! Kelsey from Chasing Cinderella Blog here and I’m excited to partner with Remington® to show you how you can get three different curls from one styling tool!

Remington sent me the T|Studio™ Thermaluxe™ Curling Wand and I am amazed at the quality! The ultimate ceramic barrel is cone shaped, sized from ¾” to 1”, and produces medium to large sized curls. My favorite part about this curling wand may be the fact that it has a 30-second heat-up time and a 60-minute auto shutoff! This is perfect for those of us who always forget if they remembered to turn off their iron!

The best part about the Remington Thermaluxe Curling Wand is that you can create three different looks using the same iron! Because this wand has non-slip ceramic barrel, your hair won’t slide off the rod, making it super easy to create different style curls! Below I am going to show you three different ways to curl your hair using this Remington curling wand: full curls, combo curls, and spiral curls.


Full Curls

This is the way that I usually curl my hair every day. It gives you more of a “Shirley Temple” look, with full, loose curls. To create this look, wrap your hair around the rod, keeping it flat against the barrel the whole way.


Combo Curls

This will give your curls a more textured look. You want to wrap your hair flatly at the top, wrap it around a few times, and then twist your hair the rest of the way around the rod. This will give the curls two different looks that combine for an awesome style.


Spiral Curls

This way will give you a twisted curl look. When creating this look, you want to first twist your hair tightly, spray some hairspray onto it, and then wrap the twisted hair around the curling wand! When you are finished twisting and curling all of your hair, you may think you look a bit scary- the trick is to brush out these curls with your fingers!


There you have it—getting three different curls by using one styling tool! Thanks so much for reading!

Xo Kelsey, www.chasingcinderellablog.com


Sleek Straight Hair Tutorial

by Kim August 1, 2016


Hello everyone! It's Kimberly from the youtube beauty channel, Kimkreations P! Today I am super excited to show you how I get super, sleek, smooth hair using the Remington Thermaluxe Flat Iron! I quickly show you how to go from FRIZZ to CHIC in just 15 minutes (and I have long, long hair, so it might be less time for you!) Enjoy!!


Summer Hairstyles to Beat Frizz

by Remington Ready June 29, 2016


Hi everyone! It’s Diana from 204 Park here again today to talk to you about summer hair. Let’s get real here for a second, in the summer it can be hard with the heat and humidity to keep your locks looking smooth. It’s easy to let frizz take over and ruin your hair but I want to share today how I keep my hair under control during the summer months.


Most of the time I like to wear my hair straight and to keep frizz at bay I use my Remington T|Studio PROtect Straightener. I cannot tell you guys how much of a game changer this straightener has been for me. It uses ceramic plates in combination with a vapor infusion technology that helps not only straighten and smooth your hair but conditions and prevents breakage at the same time! AKA - it’s AMAZING!


The vapor technology works with either distilled water or the Macadamia Conditioning Treatment. When you press the vapor release button, cool vapors are absorbed into the hair, protecting it from damage while you style. How incredible is that?!

Now onto the styling…

Because I wear my hair down most of the time I’m always looking for ways to mix things up a little bit that don’t take too much time. First, I smooth my hair out and detangle with my Remington Glitter Vent Brush to prep for the headwrap. I love my braided headwrap because it’s reversible and can also be worn several ways. For a sleek look, I like to wear it as a headband with my hair either down or in a ponytail or bun. For more of a boho vibe (or hello- summer music festivals!) I wear it as a head wrap. The elastic keeps it from moving around and it’s comfortable all day! Which look is your favorite?


Thanks again for having me, until next time!
Xo, Diana

Effortless Hairstyles with Accessories

by Remington Ready June 24, 2016


Hi! Sonja here and I'm back again with another collaboration with Remington, but this time I'm featuring a handful of their super cute hair accessories for the summer. I actually braided my hair the night before hence the wavy look, but you can style it however you like. Here are just some tips on how to do super easy hairstyles with these dainty accessories that are perfect for festivals, barbecues, or any outdoor events that you plan on having in the summertime!


Remington 5 ct Clips/Barrettes, Remington Flower Headwrap (Available at Target), Decorative Headwrap, Metal Arrow Headband


Hair Extensions Looped Bristle Brush, Teasing Brush

Here are the tools and accessories that Remington sent me to test out, all of which I'll be using for this post except for the Hair Extensions Looped Bristle Brush since I won't be wearing my hair extensions today.


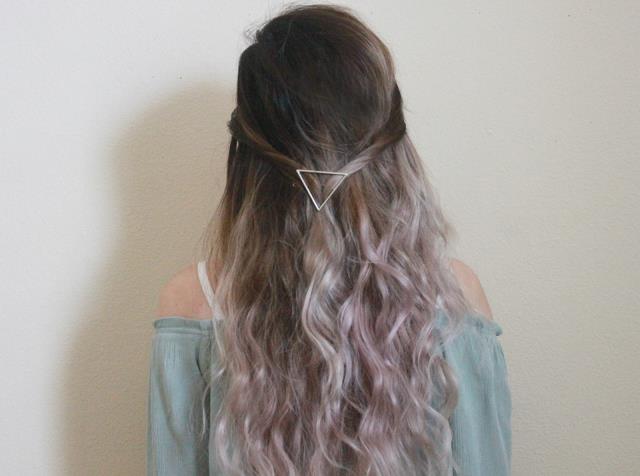
Starting off with the easiest look, I teased the crown of my hair for a little bit of volume using the Remington Teasing Brush. I then took about a 1" section from both sides of my hair, twisted them loosely, and secured them with the triangle clip. If you want a more effortless look, leave little sections in the front to frame your face. The clip won't budge, so you don't have to worry about it falling off when you're rocking out to your favorite bands!


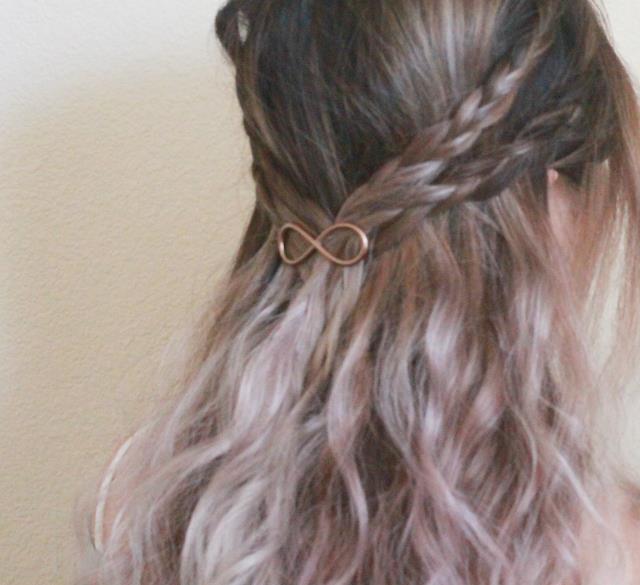
Here's something that requires a little bit more work but still totally simple and doable. I took 1-2" sections right above my ears and did two regular braids. A few inches above those sections, I took another 1-2" sections and did the same thing. I then brought all 4 braids together to the back of my head as centered as possible, and secured them with the infinity clip. This one feels even more secure than the triangle clip, so these little braids surely won't fall apart! If you want, you could loosen the braids for a messier look as well.


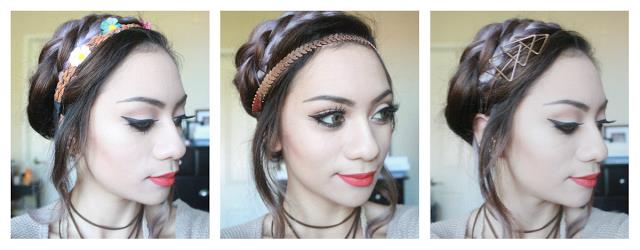
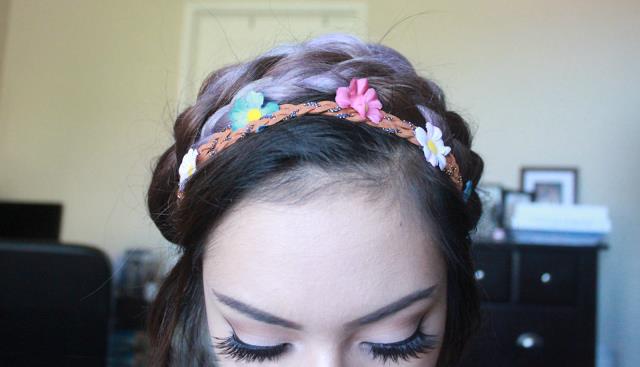
Remington Flower Headwrap, Decorative Headwrap, Metal Arrow Headband

For the photos above, I styled a braided crown using three vastly different hair bands that you can use for various occasions. First off, to do this ethereal bohemian hairstyle, start off by braiding pigtails and securing them with elastics. Bring one side of the pigtail all the way around the other side and bobby pin securely. Do the same thing on the other side by positioning the braid however you like - it can be on top of the other braid or right next to it. You may also want to leave thin curled sections in the front to frame your face.

Now you're ready to soak up the sun with your hair looking super chic and summer-ready!

xoxo,

Simple Stylings

Braided Top Knot Tutorial

by Remington Ready May 27, 2016


Hi everyone! Diana from 204 Park here today and I’m really excited to be partnering with Remington to share with you my go-to hairstyle for those hot summer days. As soon as the temperature rises I immediately gravitate towards top knots to stay cool. Today I’m sharing a braided twist on the top knot that’s sweet, simple and seriously elevates your look. Here’s what you’ll need:


Remington Glitter Vent Brush, Remington Teasing Brush, Remington Bow Clip, Bobby Pins, 2-3 Elastics, Hairspray


This hairstyle is easiest on second or third day hair. To start, brush your hair with the glitter vent brush to make sure you’re starting with a smooth base. Then, using the end of the teasing brush, separate the bottom ⅓ of your hair straight across and secure the top portion of your hair with an elastic.


To get a bit of volume, use the teasing brush to add some texture to the bottom ⅓ of your hair. Then, separate the bottom section of hair and begin braiding. You might find it easier to flip your head upside down to do this. Once the braid is complete, secure with an elastic. For a fuller braided look, gently pull the braid with your fingers to make the braid a bit looser and wider.


Once your braid is complete, secure the top portion of your hair into a ponytail, tucking the braid into the elastic. You’ll then create a bun with your ponytail using an elastic or bobby pins or both. To keep any flyaways at bay use a spritz of hairspray.


Lastly, finish the look with a sweet bow clip and your braided top knot is complete! With a bit of practice this look is easy to master and is a major upgrade from your basic topknot. Now you’re ready to look cute and stay cool all summer long! Thanks for having me!


Xo, Diana - 204 Park


Loose Waves and Dutch Braid Tutorial

by Chaney May 18, 2016


Hello everyone, my name is Chaney!
I have a YouTube channel where I share my love for life, hair, makeup, and music. With summer quickly approaching, I want to show you guys how I like to use the Remington T Studio Silk Ceramic Flat Iron to create loose curls along with an easy way to braid back the front of your hair to keep it out of your face for the hot summer months. Enjoy!


See more from Chaney on her Youtube Channel

Beach-Ready Waves

by Sonja May 6, 2016


I've partnered with Remington once again to bring you this beach-ready look using their amazing T|Studio SILK Ceramic Slim Styling Wand. To see how to achieve this quick and easy look, keep reading!


The T|Studio SILK Ceramic Slim Styling Wand is the most advanced ceramic curling iron featuring a coating with real SILK proteins and provides more ceramic content than traditional curling tools, giving you a healthy, effortless, long-lasting curl with less frizz and damage. Silk ceramic combined with 410-degree high heat and professional performance creates smooth, beautiful and fast salon results.


What I find really unique about this curling iron is the tapered end - the barrel goes from 1/2" to 1", which allows you to achieve loose waves, tight bouncy curls, or even both! In this case, I went for a combination of loose and tight curls for a messy hairstyle that's perfect for the beach or just about any spring or summer outing.

It also comes with a glove to protect your hands from the heat, but if you're careful enough, this styling wand is quite user-friendly and I was able to achieve this look in just under 15 minutes. With a little bit of hair serum and heat protectant, you don't have to worry about it damaging your hair like most curling wands tend to do.


To accompany these sultry loose waves, I came up with a relatively simple beach-ready makeup tutorial. Since the intense summer heat calls for minimal makeup, I went for a natural-finish foundation with SPF, my usual winged eyeliner, a pair of natural-looking wispy falsies, a "my lips but better" liquid lipstick, and a whole lot of golden highlight for that striking summer glow.

Here's a quick walk-through:


1. Apply a light peach eye eyeshadow base all over the eyelid, extending it to the brow bone.
2. Add a touch of gold shimmer on the lids.
3. Wing your eyeliner and draw it as close to the lash line as possible.
4. Apply gel liner on the waterline and smoke out the bottom lash line with a dark brown eyeshadow.
5. Curl lashes, apply mascara, and glue on your favorite pair of falsies (I used House of Lashes in Leatherette).

And there you have it - a summer-friendly hair and makeup look that's perfect for a stroll on the beach or the pier. Be sure to check out Remington's T|Studio SILK Ceramic Slim Styling Wand if you want to achieve these loose messy waves! Also, stay tuned for yet another collaboration with Remington that will feature some really exciting products!

'Til next time.
xoxo,


Coachella Inspired Hairstyle

by Alex Gaboury April 22, 2016


Hi my name is Alex, (just Alex, my parents kept it short and sweet) and I have a channel here on Youtube where I share my love for hair, beauty, and my pup named Sophie. Since festival season is amongst us I thought I would share with you a simple Coachella inspired braided hairstyle that can be easily personalized to reflect your style with fun hair accessories. Now this hairstyle would not be possible without the help of my Wet2Dry straightener which has easily become one of my favourite hot tools for my hair. I would love to hear which hair accessory was your favourite, or even better, if you will be attending any festivals this year, let me know in the comments below.
xo Alex


See more from Alex on her Youtube Channel


Learn more about the Wet2Straight Straightener