Index Background

3 Back-to-School Hairstyles

by Rachel August 22, 2016


Hey there, everyone! My name is Rachel and I’m a fashion/lifestyle blogger over at my website, Rachel Lynn. I don’t know about you, but I am so excited for the upcoming school year. There’s always something magical in the air this time of year. Everyone is buying new clothes, school supplies and crafting the perfect back to school haircut, which brings me to the topic of this post. Today I will be discussing my top 3 favorite hairstyles featuring the Remington curling wand, perfect for back to school!

I know when I’m trying to get work done I need my hair out of my face. If I’m constantly touching my hair because it’s in my face, I immediately start wondering if my hair still looks good and then it all goes downhill from there!

Productivity- 0
Hair- 1,237

So without further ado, my top 3 favorite hairstyles featuring a curling wand, perfect for back to school!


CURLS WITH BRAID

When I was in high school I wore this style braid all of the time and recently it’s made quite a comeback.

I start by curling my hair using the Remington T|Studio Thermaluxe Curling Wand. This wand is amazing because it heats up in only 30 seconds and curls hair even faster. Talk about fast results! I always curl my hair away from my face. This gives the look a more wind blow, beachy effect—very flattering!


After that, I grab a section of hair from the front of my head and separate that into three equal parts. For this style, a Dutch braid is best. Take the two end pieces and braid them under the center piece. This gives the braid a more 3D effect.


Stop braiding once you reach your ear and secure the braid behind it. Now, all you need is a spritz of hairspray and you’re ready to go!


HALF-UP BUN

This is another quick and easy hairstyle, ideal for those lazy mornings you don’t want to put too much effort in, but still want to look cute!


I always start off this style by putting my hair up. Section off the top half of your hair and put it in a tight, messy bun. This is a lifesaver on mornings when you want to look cute and save time doing it. You only need to curl the bottom half of your hair. Believe me, if you’re anything like me and most mornings are a blur of foundation and toothpaste, the quicker the hair style, the better!


DAY 2 PONYTAIL

Okay, lets be real. I could wear this style any and every day, regardless of when the last time I showered was. However, if you were up late studying the night before and didn’t have time to wash your hair, DON’T PANIC! On mornings like these, I spritz a little dry shampoo into my hair before throwing it up into a high ponytail. If this is your second day of curls then a light touch up and a cute headband is all you need before you’re ready to walk out the door!

Even if you’re starting fresh, this style is super fast and easy. I don’t know why, but curling my hair when it’s in a ponytail is always quicker for me to do than otherwise!


For a clean look, take a piece of the ponytail, wrap it around your hair tie, and secure firmly. Now you have a look that took less than 10 minutes, is chic, but also effortless. Sounds like a win-win to me!


xoxo,
Rachel Lynn


Effortless Hairstyles with Accessories

by Remington Ready June 24, 2016


Hi! Sonja here and I'm back again with another collaboration with Remington, but this time I'm featuring a handful of their super cute hair accessories for the summer. I actually braided my hair the night before hence the wavy look, but you can style it however you like. Here are just some tips on how to do super easy hairstyles with these dainty accessories that are perfect for festivals, barbecues, or any outdoor events that you plan on having in the summertime!


Remington 5 ct Clips/Barrettes, Remington Flower Headwrap (Available at Target), Decorative Headwrap, Metal Arrow Headband


Hair Extensions Looped Bristle Brush, Teasing Brush

Here are the tools and accessories that Remington sent me to test out, all of which I'll be using for this post except for the Hair Extensions Looped Bristle Brush since I won't be wearing my hair extensions today.


Starting off with the easiest look, I teased the crown of my hair for a little bit of volume using the Remington Teasing Brush. I then took about a 1" section from both sides of my hair, twisted them loosely, and secured them with the triangle clip. If you want a more effortless look, leave little sections in the front to frame your face. The clip won't budge, so you don't have to worry about it falling off when you're rocking out to your favorite bands!


Here's something that requires a little bit more work but still totally simple and doable. I took 1-2" sections right above my ears and did two regular braids. A few inches above those sections, I took another 1-2" sections and did the same thing. I then brought all 4 braids together to the back of my head as centered as possible, and secured them with the infinity clip. This one feels even more secure than the triangle clip, so these little braids surely won't fall apart! If you want, you could loosen the braids for a messier look as well.


Remington Flower Headwrap, Decorative Headwrap, Metal Arrow Headband

For the photos above, I styled a braided crown using three vastly different hair bands that you can use for various occasions. First off, to do this ethereal bohemian hairstyle, start off by braiding pigtails and securing them with elastics. Bring one side of the pigtail all the way around the other side and bobby pin securely. Do the same thing on the other side by positioning the braid however you like - it can be on top of the other braid or right next to it. You may also want to leave thin curled sections in the front to frame your face.

Now you're ready to soak up the sun with your hair looking super chic and summer-ready!

xoxo,

Simple Stylings

Braided Top Knot Tutorial

by Remington Ready May 27, 2016


Hi everyone! Diana from 204 Park here today and I’m really excited to be partnering with Remington to share with you my go-to hairstyle for those hot summer days. As soon as the temperature rises I immediately gravitate towards top knots to stay cool. Today I’m sharing a braided twist on the top knot that’s sweet, simple and seriously elevates your look. Here’s what you’ll need:


Remington Glitter Vent Brush, Remington Teasing Brush, Remington Bow Clip, Bobby Pins, 2-3 Elastics, Hairspray


This hairstyle is easiest on second or third day hair. To start, brush your hair with the glitter vent brush to make sure you’re starting with a smooth base. Then, using the end of the teasing brush, separate the bottom ⅓ of your hair straight across and secure the top portion of your hair with an elastic.


To get a bit of volume, use the teasing brush to add some texture to the bottom ⅓ of your hair. Then, separate the bottom section of hair and begin braiding. You might find it easier to flip your head upside down to do this. Once the braid is complete, secure with an elastic. For a fuller braided look, gently pull the braid with your fingers to make the braid a bit looser and wider.


Once your braid is complete, secure the top portion of your hair into a ponytail, tucking the braid into the elastic. You’ll then create a bun with your ponytail using an elastic or bobby pins or both. To keep any flyaways at bay use a spritz of hairspray.


Lastly, finish the look with a sweet bow clip and your braided top knot is complete! With a bit of practice this look is easy to master and is a major upgrade from your basic topknot. Now you’re ready to look cute and stay cool all summer long! Thanks for having me!


Xo, Diana - 204 Park


Loose Waves and Dutch Braid Tutorial

by Chaney May 18, 2016


Hello everyone, my name is Chaney!
I have a YouTube channel where I share my love for life, hair, makeup, and music. With summer quickly approaching, I want to show you guys how I like to use the Remington T Studio Silk Ceramic Flat Iron to create loose curls along with an easy way to braid back the front of your hair to keep it out of your face for the hot summer months. Enjoy!


See more from Chaney on her Youtube Channel

Coachella Inspired Hairstyle

by Alex Gaboury April 22, 2016


Hi my name is Alex, (just Alex, my parents kept it short and sweet) and I have a channel here on Youtube where I share my love for hair, beauty, and my pup named Sophie. Since festival season is amongst us I thought I would share with you a simple Coachella inspired braided hairstyle that can be easily personalized to reflect your style with fun hair accessories. Now this hairstyle would not be possible without the help of my Wet2Dry straightener which has easily become one of my favourite hot tools for my hair. I would love to hear which hair accessory was your favourite, or even better, if you will be attending any festivals this year, let me know in the comments below.
xo Alex


See more from Alex on her Youtube Channel


Learn more about the Wet2Straight Straightener

#SmokeySleek Tutorial

by Evie December 16, 2015


Hey Everyone! This Evie from LongHairPrettyNails and I'm today's guest blogger for Remington. In this video, I'm going to show you how I created this #GlamorousMe sultry smokey eye makeup look with nude lip. I'm also going to show you guys I achieved this side braid sleek hairstyle using the T|Studio Protect Straightener. It's easy and perfect for the holidays! I really hope you guys enjoy this tutorial. To see more beauty content and tutorials, head over to my blog LongHairPrettyNails and my YouTube channel LongHairPrettyNails


Learn more about the T|Studio PROtect Flat Iron


Braided Fall Waves

by Diana November 9, 2015


Hey everyone! My name is Diana and I'm a Canadian blogger over at 204 Park from Edmonton, Alberta. I'm SO excited to be guest blogging for Remington because today, I'll be sharing a fun braided look with one of my favorite hair tools!


Summer may long be over but that doesn't mean you need to give up your beach-y waves. Today I've got a simple braided hairstyle that's perfect for fall! All you need is your Remington 2 in 1 curling iron a few bobby pins, a hair clip, elastics and some hairspray.


Step 1: Start with your straight or natural hair and section away to begin curling. I like to clip the top half of my hair up to start at the bottom and work my way up in sections. 


Step 2: Curl your hair into loose waves. For a more natural wave, swap the direction of your curl as you move along to each section. For example, if you start your first curl with an "over curl" (wrapping your hair over the curling iron), curl your next piece with an "under curl" by starting to wrap your hair under the curling iron. 


Step 3: Once your hair is nicely curled use a quick shot of hairspray and run your fingers lightly through the curls so they look loose and natural. Then section the top 1/3 of your hair into two smaller sections along your part and start a simple braid in each section. Secure with an elastic.


Step 4: Pull the two braids towards one another and then, loosening a section in one of the braids, pull the other braid through so the two intertwine.


Step 5: Secure with bobby pins and hairspray then remove the elastics at the end of the braids for a natural look


With that you've created a simple fall braid that is perfect for fall.

Happy hairstyling babes!


Hat Hairstyles: Knotted Up-Do

by Remington Ready January 21, 2015


This up-do is more of a “low-do”, keeping the style below hat level! It’s Dutch-styled and unique, making you look like a skilled trendsetter without all the work.


Style Tip: If you have layered hair, pieces may fall out during the day. Just keep bobby pins handy to pin in any strays. It only adds to the look!


Tools: Bobby Pins


    1.  Start with natural hair, adding texture spray if needed.


    2.  Divide hair into four even sections.


    3.  Tie sections A and B together into a tight knot and secure with clip, then knot                sections C and D and clip.


    4.  Tie the center two strands, B and C, into a knot using a clip to hold sections A              and D in place.


    5.  Continue knotting each side and then the center until about 3-4” of ends are left.            Make sure to keep each knot tight!


    6.  Use bobby pins to secure the ends of the sections under the braided area.


    7.  Voila! Your knotted up-do is complete. Just add finishing spray as needed                   and throw on your hat! Pull the hat down so it’s just above the knotted hair.


New Years' Hairstyles

by Remington Ready December 29, 2014


You may have your New Year’s Eve outfit planned, but what about something special for your hair? Try one of these new styles to complete your look for a fun night out celebrating the New Year. You’ll make an elegant statement without too much work— just follow the steps below!
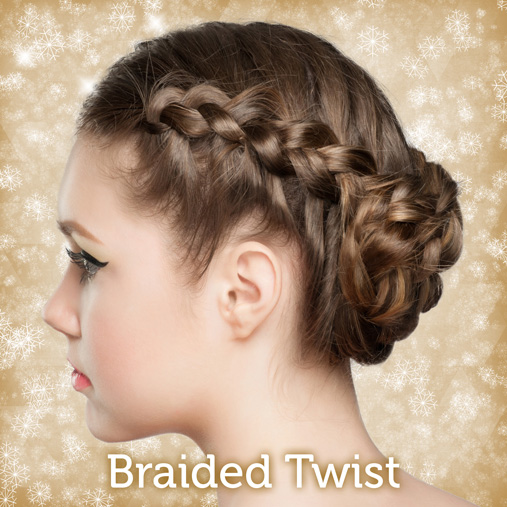
 

Braided Twist


Braids are all the rage and they can even create a classy up-do! It will look like you spent all morning doing your hair, but it only takes a few minutes.


Style tip: create this style on first-day hair, then let the braids down on day two for some fun waves!


Tools: ElasticsBobby Pins


    1.  Create a center part and divide the hair in two sections.


    2.  Starting on one side near the forehead, French braid hair by crossing each                    section under the other, instead of over the other like normal braiding. Secure                end of braid with an elastic.


    3.  Repeat step one on the other side section of hair.


    4.  Wrap the braids around each other into a low bun, tucking the ends in and                    securing with bobby pins. 


    5.  Set the style with finishing spray to complete this braided twist!


Side Sweep Curls


The side sweep look is gorgeous with curls, but elastics and bobby pins can’t quite handle the task. The Simple Twist pin makes it easy to create this elegant look and will securely hold it all day long!


Style Tip: dress up this look even more by adding a decorative headband!


Tools: TStudio Silk Oval Wand, Simple Twist 


    1.  Section hair and curl 1-2” sections with the TStudio Silk Oval Wand.


    2.  Tease hair lightly around the crown, adding hair spray. 


    3.  Gather hair to the side and twist hair towards the ear.


    4.  Push the Simple Twist pin through and twist towards the ear, then flip it back into          the twist to secure. Pin should be close to the scalp when pushed back in.


    5.  Loosen a few curls around the face and set with finishing spray to complete                  these side sweep curls!


Headwrap Ringlets


This headwrap look works with any style or party! Use a boho braided headwrap for casual occasions or a beaded headwrap to really dress it up.


Style Tip: just like the braided twist, this look can be let down on day two hair for awesome curls!


Tools: TStudio Silk Oval WandBraided HeadwrapBeaded Headwrap


    1.  Section hair and curl 1-2” sections with the T|Studio Silk Oval Wand.


    2.  Slide a skinny headwrap over the head, so it is across or right above the                      forehead.


    3.  Starting on one side, loop a 2” section of hair around the headwrap until it creates          a ringlet, then secure the end of the strand in the headwrap band. 


    4.  Continue looping sections until all hair is secured around the headwrap. 


    5.  Add bobby pins as needed and set with finishing spray for this headwrap ringlet            style!


Prom Perfection

by Kelley Krueger March 26, 2012

Prom is near and the search for the perfect dress and updo begins! To help with the search, we’ve enlisted hair diva extraordinaire, Kelley Krueger, to show us how to create two great looks. Kelley is a hair stylist for the Bellezza Salon at the Beverly Hilton Hotel in Los Angeles and has worked with celebrity clients including Debra Messing, Daisy Fuentes, Kelly Osbourne, and Brook Shields.


Be a Braided Beauty


1. Start by parting your hair and tease the top of the back of your head.


2. Take a 1 inch thick section of hair and begin braiding. You can do a french braid OR if that is too difficult a regular braid works well.


3. Bobby pin the braid at a downward slant towards the back of your head. Make sure it is long enough that it would reach a ponytail.


4. Give yourself a ponytail. High or low. Both work. Be sure to apply spray shine and hairspray for a sleek finished look


5. Take the whole ponytail and wrap around your hair around its base. It's ok of hair falls out - remember you can always pin any loose ends.


6. Pin away! Be sure to use Bobbi Pins that match your hair color :)


Or Sleek and Sensual


1. First part your hair in desired area ...


2. Then take 1 inch thick sections of hair and wrap it around your curling wand. Typically curl in a backward motion away from the head.


3. Brush all curl out with a soft bristle brush.


4. Gather hair and spray. This look is ideal for shorter hair but looks beautiful with any length.


For each of the looks I used a mirror, elastic hair band, bobby pins (preferably ones that match your hair color), Remington TStudio Pearl Ceramic Styling Wand, and a soft bristle brush.


Happy styling :)

KK