Index Background

The #1 Tip For Beautiful, Radiant Hair

by Remington Ready July 8, 2016


Want gorgeous hairstyles that last all day? So do we! And for that, there’s Thermaluxe™!

24/7 Lifestyle. 24-Hour Hairstyle.
We know you’re active and always on the run, and you want to depend on your hairstyle to keep up with you. That’s why we made Thermaluxe™. It lets you create styles that stay gorgeous through anything you do with your fast-paced lifestyle. So don’t let the fear of flat hair hold you back! Thermaluxe™ gives you all-day styles!

Advanced Thermal Technology
How does Thermaluxe create these beautiful, long-lasting styles? The secret is the optimized heating technology, which is unique to each of the styling tools. The innovative heat makes curling, straightening, and drying fast and hair-friendly.

Check out the Thermaluxe™ lineup to see what haircare tool can transform your style!


Straighteners
Faster and long lasting! The floating ceramic plates (1” and 2”) maintain even temperatures for fast straightening that lasts all day. And because it works 33% faster than standard Remington straighteners, your hair is exposed to less heat and stays looking awesome!
- 450°F Heat
- 10x More Ceramic than standard Remington straighteners
- 15-second Heat-Up

Curling Wands
Tapered heating is the secret to healthy, long-lasting curls. The ceramic barrel (½”-1” and 1”- 1½”) is hotter at the base to curl your thick roots while the tip of the barrel is cooler and gentle on your ends. The result is beautiful curls and waves that last all day!
- 410°F Heat
- Slip-Free Ceramic Barrel
- 30-Second Heat-Up

Dryer
Hot spots are a problem with most dryers. So Thermaluxe™ fixed it. Even heating combines with ionic technology to dry hair quickly and help prevent annoying frizz. It even has three heat settings and two speeds so you can find the best drying for your hair.
- 50% faster drying than standard Remington dryers
- Ionic-Ceramic Technology
- Lightweight AC, Salon-Quality Motor
- Fabric, Tangle-Free Cord

Setter
Want quick curls? How does 5 minutes sound?! The patented Dual-Heating Technology heats hair from the inside with the roller and from the outside with the clip. Plus, the clips are specially designed to help prevent creases and deliver a secure hold.
- 5-Minute Curls
- Dual-Heating Technology
- 20 Rollers (12 large—1¼”, 8 medium—1”)
- Space-Saving Storage Design

Back to Basics: Cleaning Your Styling Tools

by Remington Ready October 15, 2012

Listen up lovely ladies (and gents)! When you stop and think of how funky and gross some of your styling tools can get and all of the dust, oils, and germs that accumulates, you’ll start looking at those hairballs differently. No worries – we’re here to help! Cleaning your styling tools will not only give you more control while styling, but also smoother, shiner hair. No germs and shiny hair? WIN!  


NOTE: Make sure your styling tools are unplugged and cooled before cleaning!!!


Hair Dryer – Simply remove the air vent (circular area located in back) and clean lint off the filter with an old toothbrush. Replace the filter and put the air vent back on! Lastly, wipe down the exterior of your dryer with an anti-bacterial wipe. Voila! Remember to clean the vent area about once a month to help with air circulation through your blow dryer. It also extends the life of your blow dryer by preventing it from overheating!


Straightener – Take a damp washcloth and gently wash off the plates from any build-up. If the straightener has floating plates, take a small pin and gently run it under the plates to remove any build-up. If you still have stubborn, try using rubbing alcohol on a soft rag. Make sure that you squeeze out the excess alcohol from your rag before cleaning your flat iron to prevent alcohol from getting inside. 


Brush Grab a pen or pencil and slide the pointed end under the hair build-up from the bottom of the brush to the top. Pull up until the hair starts to loosen. Then take a scissors and carefully cut straight down the middle. Pull the clumps apart and discard any hairballs. To clean the rest of the brush, use shampoo on a toothbrush with warm water to scrub the base of the brush between the bristles. Rinse the brush, and then lay it face down to dry.


Curling Iron/Wand Wipe the barrel and handle with a damp cloth. To remove heavy build-up, use rubbing alcohol instead of water. Another secret tip is to mix 1 part warm water with 1 part liquid fabric softener and put mixture on a cloth or q-tip. Wipe down your curling iron with the cloth or use a q-tip to get those small, hard to reach areas. 


Our Curl Crush

by Remington Ready February 20, 2012

Curl Crush


Who isn't after those luscious curls seen on stars and in magazines all the time? While practice makes perfect with killer curls, one thing that helps is a curling wand! For those of you that aren't familiar with the tool, a curling wand is a clipless curling iron. One of the favorites among the Remington Team and our fans is the TStudio Pearl Ceramic Styling Wand. The beauty of this tool is that its cone design can create a variety of curls without the annoying clap mark that some curling irons leave, giving you with a more natural look. It also has crushed pearl infused barrel, leaving hair shinier and smoother. Trends and styles come and go, but smooth and silky hair is always in style!


Here's our secret to creating crush worthy beachy curls with the Pearl Styling Wand:


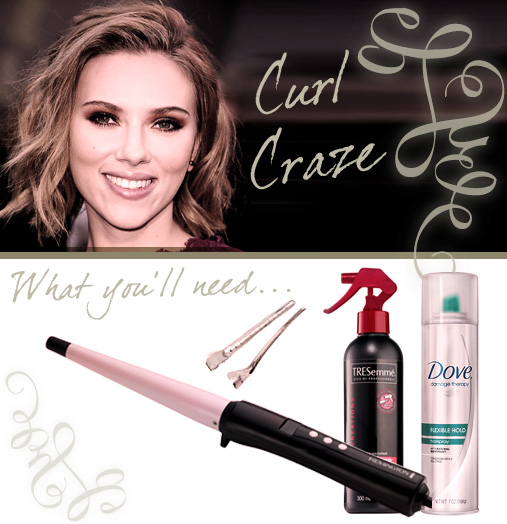
What you will need: protective spray/argan oil, duckbill clip, Remington TStudio Pearl Ceramic Styling Wand, light holding hairspray.


1. Apply protective spray or argan oil to the ends of your hair.


2. Part your hair from ear to ear and pin up the top portion of your hair with a duckbill clip. You will start curling at the bottom and work your way up. If you have very thick hair, you may want to portion off smaller sections.


3. Put the included heat protective glove on your free hand.


4. Point the tip of the wand towards the ground. Starting at the barrel's base and working towards the tip, wrap sections of hair away from your face. Tight curls = thinner sections, loose curls = thicker sections.


5. Once the bottom portion is done, make another part through hair from upper temple to upper temple, pin up the top portion with the duckbill clip and curl. Once the middle section is curled, unpin the top section of hair and curl*.


6. Once your hair has cooled, soften the curls by gently breaking them apart with your fingers. To finish - add hairspray!


*Insider tip: for va-va-volume, back comb the last section of your hair before curling it.


Image Source: Steve Granitz/Wire Image - InStyle

Your Hair Gets Healthier With Styling

by Tammy Gibson January 30, 2012

Keratin Therapy: Strengthen While You Style


Who would have guessed that the day would come when your hair would actually get healthier with heat styling? Well, the day is here thanks to Remington's new Keratin Therapy line! These styling tools offer up all kinds of great benefits for your hair!

READ MORE read more