Index Background

The Perfect Valentine’s Day Curls

by Remington Ready February 6, 2017

It is officially the season of l.o.v.e. Whether you actively participate in Valentine’s Day or not, there are so many ways to get in the holiday spirit! Today I will be showing you my favorite Valentine’s Day inspired hairstyles with curls.


Whenever I think of Valentine’s Day, I think of a classic, elegant style. I think deep reds,and big curls. One of the biggest problems I run into when getting ready is deciding what to do with my hair. I almost always dress up, so I want my hair to compliment my outfit and not take center stage. These three hairstyles are simple enough to do just that, all while still creating a romantic, put together ensemble.


Style 1:

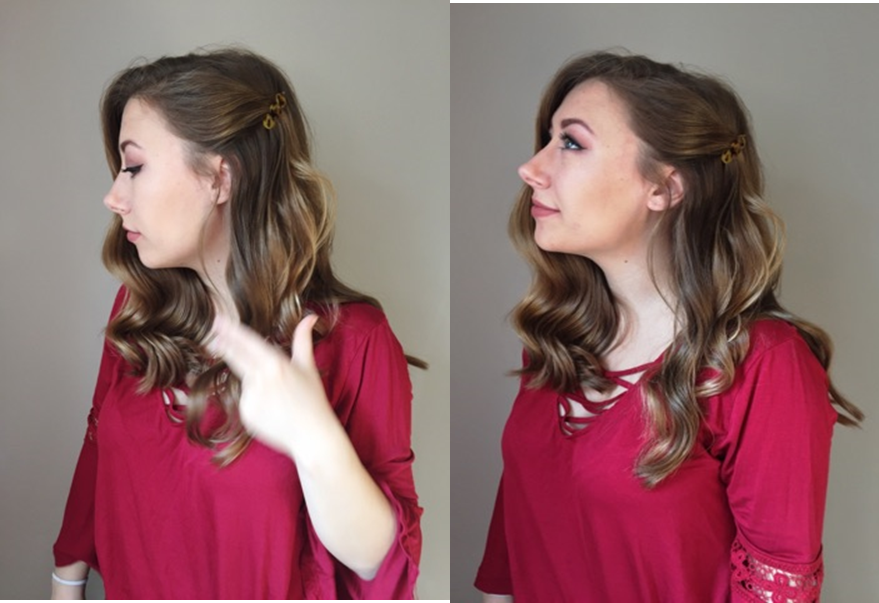
This first style is the quintessential Valentine’s Day look & the best part is that it is beyond easy to create. All you need for this style is freshly curled hair and a hair clip. 
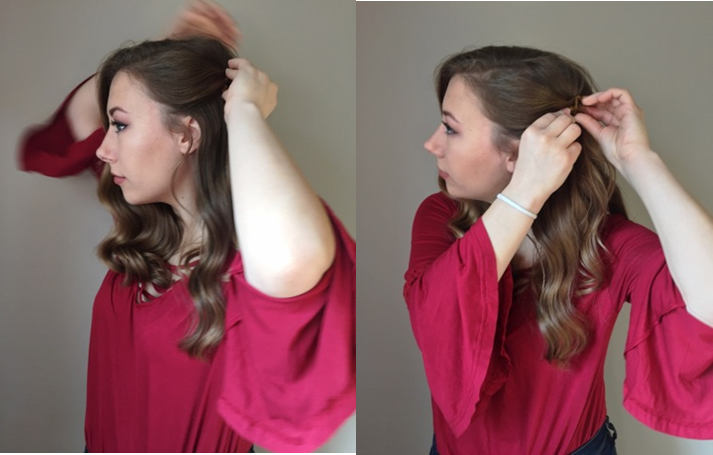


Once you’ve curled your hair, take a section of hair and pin that up to the side and towards the back. I usually twist my hair up and back once to give a little volume and help secure the look.

This asymmetrically look is so simple and romantic! It’s perfect for a fancy Valentine’s dinner or really any formal occasion.  You can dress this look up even more with a delicate barrette or hairpin.


Style 2:

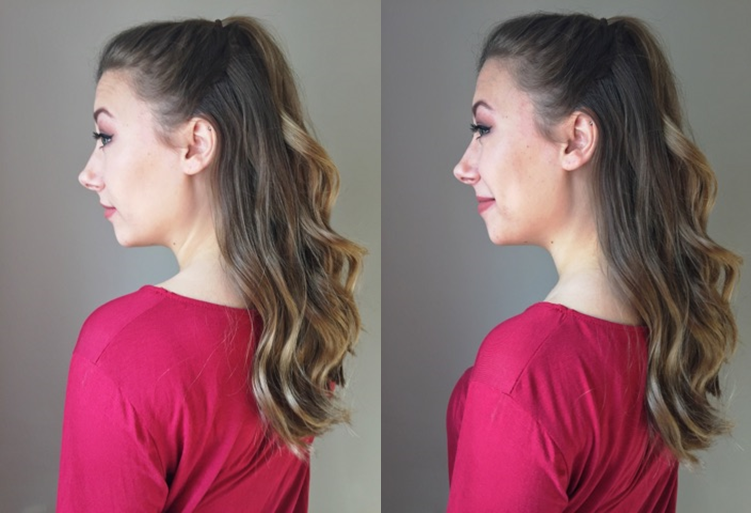
Like I said earlier, I love to dress up and curl my hair for Valentine’s Day, but you never want to be that girl that is clearly going way to hard for dinner or a movie. This second look is casual but still put together—perfect for those more laidback dates.  
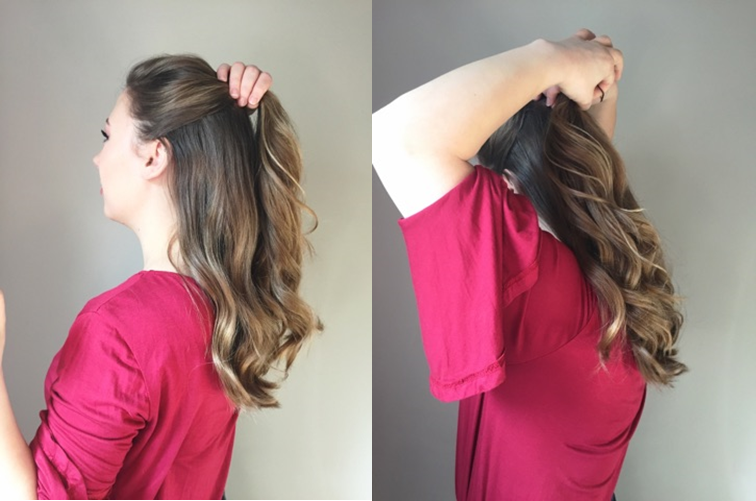


Start by curling your hair in loose waves. Once you have this finished, separate the top half of your hair into a high ponytail. The curled ponytail gives your hair a more textured, waterfall effect.  It is the quintessential “casual, yet chic” look. No one will be questioning your cute curls in this style! 


Style 3:

When I was in high school I used to be obsessed with low buns. As I grew up and styles changed, the low, messy bun was replaced by the high sock bun. Recently, the former has been making a comeback and I find myself rocking this style more and more.


I start this off by curling my hair. Now, you can definitely do this without curling your hair, but if you’re going for a romantic, “artfully messy” look, curling your hair first is key! 


Then, I pin back a section of my hair on each side. This allows you to decide how your hair will frame your face. Whether you like it pulled back and tight or loose and teased, this first step allows you to make that decision.


 After the front sections of my hair are secure, I gather my hair up into a relative bun and secure that. I like my low buns to be loose and artfully messy, so after everything is secure I slowly loosen up sections of my bun to give a more textured look. Here is where curling your hair before is particularly important. If a few pieces fall out here and there, they are still curled. This gives the look added elegance, without seeming too manicured!  


Category:

Tags:

Not Your Grandma's Setter

by Kelsey October 24, 2016


Hey Ya’ll! Kelsey from Chasing Cinderella Blog here and I’m excited to partner with Remington® to show you that a hair setter isn’t just what your grandma uses to curl her hair, but a quick an easy way to get your everyday curls in under 5 minutes! Remington sent me the T|Studio™ Thermaluxe™ Hair Setter and I was paid for this post. 


I’m not going to lie to you, when I was first approached about the hair setter; I was a little bit confused. Those things still existed?! But I am always looking for new ways to curl my hair, so I thought, “why not?” and had Remington send me the hair setter. I was so impressed by the space-saving design that I knew I had made a great choice by trying out this setter!


The T Studio Thermaluxe Setter comes with 20 clips and rollers in two sizes, 12 large (1 ¼”) and 8 medium (1”) rollers, making it easy to quickly create a head full of beautiful curls. With a 90-second heat-up time, the dual heating technology heats up the curls from the inside and outside, allowing maximum heat transfer onto the hair, allowing your curls to set faster and hold longer. You can curl your whole head in 5 minutes, rather than the 20 minutes it can take with other tools. 


Applying the rollers is super easy, and takes no time at all! First, you need to section your hair and run a brush through it to ensure you have no tangles. Then you roll your hair as you usually would, in the direction of your desired style. Once the roller is against your head, use the clip and clip the roller in place. Continue this process until your entire head is set. Depending on the type of curls you going for, determine how long you will keep the rollers in your hair. The longer you keep the rollers in, the tighter your girl will be. I went for a loose/wavy curl, so I kept the roller in for only a few minutes, but the rollers will remain actively curling for approximately 15 minutes. Warning: you will look like your grandma when your hair is full of rollers!


Once your rollers have been in place for as long as you would like, it’s time to take them out! To release the roller, remove each clip and roller gently. Once you unwind each roller, let each new curl spring back into position and cool for a moment. I then like to brush out my curls so they look a little more natural. Then spray a little bit of hair spray and you’re good to go!


There you have it—curling your hair made 100% easier! Thanks so much for reading! 


Xo Kelsey, www.chasingcinderellablog.com


Category:

Tags: , , ,

4 Fall Hairstyles to do with a Curling Wand and Accessories

by Rachel September 16, 2016


Hey there, everyone! My name is Rachel and I’m a fashion/lifestyle blogger over at my website, Rachel Lynn.  I’m back to bring you more fun hairstyles perfect for the crisp Fall weather that is quickly approaching. I don’t know about you, but lately I’ve been so excited for Fall! Apple cider, Halloween, changing leaves and pumpkin everything has got me ready to say goodbye to summer and hello to Fall. So today I’m bringing you 4 of my favorite Fall Hairstyles to do with a curling wand. For these tutorials I’ll be using my Remington T|Studio Thermaluxe Curling Wand. I love how fast this wand heats up and how quickly it actually curls my hair! For a girl on the go, this wand is a must.


Curls & Volume

Everywhere I look lately, people are all about voluptuous hair. Not that people haven’t been dying for volume since the beginning of time, but lately I’ve been seeing volume on top of volume—especially on the runway! This hairstyle is super easy to create. Start with your basic curl using your Thermaluxe curling wand. Wrap your hair around the wand, leaving as much space in between each strand on the barrel as possible. When there’s more space on the barrel, your  curls will turn out looser and fuller! 


After that, I take my hands, hold small sections of my hair and push up on the rest of it. This isn't quite like teasing hair - although if you want even more volume that will definitely work - but it will still get the job done!


Greek-Inspired Twist

This style is even easier than the last! I like to start with a curled base, because the curls give my hair more volume. Who doesn't want more volume in their hair?! After the curl, place the hair band on top of your hair - not underneath it. Then, simply take sections of your hair and curl them up, over and then underneath of the hair band. This gives the circular twist look. 


 I always mess around with mine a bit, pulling some strands looser here and others tighter in order to give the desired effect. 


Pony Tail Twist

This look is very similar to the Greek-inspired twist, but with a ponytail. I start by sectioning off section of hair towards the front of my head and twisting it back towards the base of my head. You can make this twist as tight or loose as you want. I usually add in hair as I get closer to the base of my head.


Once you do this to both sides secure tightly with a hair tie. Low ponytails are HUGE this fall. I've seen them all over the runway, and this look would be perfect with a sweater and a scarf. I always like to take a piece of hair and wrap it around the hair tie. I feel like this gives the look a cleaner effect - much more chic!


Knots, Knots and More Knots!

If there's one thing that the runway is crazy about - besides vintage accents and 80's inspired hair - it's knots! Any and every type of knot! Some of them look super crazy and messy and other a very prim and proper. I'm the personality that loves a little craziness. Maybe that's because I'm always in a rush when I'm doing my hair, but if I can pull off the 'chic mess' then it's a good day! Again, I curled my hair before hand to give my knot more volume. For this style, I simply took my hair and twisted it into a ballerina-esque bun on the lower part of my head.        


I secured it with my Remington Large Sweep and Style Barrette and was good to go!  


I love having my hair curled with this style, because then I can pull out a few strands of curled hair and give off that 'messy' vibe.


I hope these fall-inspired hairstyles bring you as much joy as any pumpkin spice latte could give you! Happy Fall! 


xoxo,

Rachel Lynn

Everyday Look with a Setter - Kim

by Kim September 12, 2016


Welcome back everyone its Kimberly, beauty blogger "kimkreationsp"! Today's look features these easy waves that are smooth, silky and super simple to style! You can leave them as so once done setting with the rollers or put them into a hairstyle that will still accentuate these sleek waves! The choice is yours and either way, your hair will look AMAZING! Did I mention it's super fast and easy?! Hope you enjoy!


See more from Kim on her Youtube Channel KimKreationsP


Learn more about the T|Studio Thermaluxe Setter

At-Home Blow Out Tutorial

by Jenny Gonzalez September 6, 2016


Hi everyone! My name is Jennifer Gonzalez and I'm a beauty/lifestyle vlogger from Orange County, CA. You can find some of my work on YouTube (jenniferg815). Some of my favorite topics to talk about on my channel is the latest most innovative products ranging from cosmetics and skincare to hair styling to hair care. This is why I am beyond excited to partner with Remington for this video to share with you my best tips and tricks on my perfect never fail blow out using Remington T-studio blow dryer. I hope you enjoy!!


Learn more about the T|Studio Thermaluxe Dryer

3 Back-to-School Hairstyles

by Rachel August 22, 2016


Hey there, everyone! My name is Rachel and I’m a fashion/lifestyle blogger over at my website, Rachel Lynn. I don’t know about you, but I am so excited for the upcoming school year. There’s always something magical in the air this time of year. Everyone is buying new clothes, school supplies and crafting the perfect back to school haircut, which brings me to the topic of this post. Today I will be discussing my top 3 favorite hairstyles featuring the Remington curling wand, perfect for back to school!

I know when I’m trying to get work done I need my hair out of my face. If I’m constantly touching my hair because it’s in my face, I immediately start wondering if my hair still looks good and then it all goes downhill from there!

Productivity- 0
Hair- 1,237

So without further ado, my top 3 favorite hairstyles featuring a curling wand, perfect for back to school!


CURLS WITH BRAID

When I was in high school I wore this style braid all of the time and recently it’s made quite a comeback.

I start by curling my hair using the Remington T|Studio Thermaluxe Curling Wand. This wand is amazing because it heats up in only 30 seconds and curls hair even faster. Talk about fast results! I always curl my hair away from my face. This gives the look a more wind blow, beachy effect—very flattering!


After that, I grab a section of hair from the front of my head and separate that into three equal parts. For this style, a Dutch braid is best. Take the two end pieces and braid them under the center piece. This gives the braid a more 3D effect.


Stop braiding once you reach your ear and secure the braid behind it. Now, all you need is a spritz of hairspray and you’re ready to go!


HALF-UP BUN

This is another quick and easy hairstyle, ideal for those lazy mornings you don’t want to put too much effort in, but still want to look cute!


I always start off this style by putting my hair up. Section off the top half of your hair and put it in a tight, messy bun. This is a lifesaver on mornings when you want to look cute and save time doing it. You only need to curl the bottom half of your hair. Believe me, if you’re anything like me and most mornings are a blur of foundation and toothpaste, the quicker the hair style, the better!


DAY 2 PONYTAIL

Okay, lets be real. I could wear this style any and every day, regardless of when the last time I showered was. However, if you were up late studying the night before and didn’t have time to wash your hair, DON’T PANIC! On mornings like these, I spritz a little dry shampoo into my hair before throwing it up into a high ponytail. If this is your second day of curls then a light touch up and a cute headband is all you need before you’re ready to walk out the door!

Even if you’re starting fresh, this style is super fast and easy. I don’t know why, but curling my hair when it’s in a ponytail is always quicker for me to do than otherwise!


For a clean look, take a piece of the ponytail, wrap it around your hair tie, and secure firmly. Now you have a look that took less than 10 minutes, is chic, but also effortless. Sounds like a win-win to me!


xoxo,
Rachel Lynn


3 Different Curls from 1 Styling Tool

by Kelsey August 15, 2016


Hey Ya’ll! Kelsey from Chasing Cinderella Blog here and I’m excited to partner with Remington® to show you how you can get three different curls from one styling tool!

Remington sent me the T|Studio™ Thermaluxe™ Curling Wand and I am amazed at the quality! The ultimate ceramic barrel is cone shaped, sized from ¾” to 1”, and produces medium to large sized curls. My favorite part about this curling wand may be the fact that it has a 30-second heat-up time and a 60-minute auto shutoff! This is perfect for those of us who always forget if they remembered to turn off their iron!

The best part about the Remington Thermaluxe Curling Wand is that you can create three different looks using the same iron! Because this wand has non-slip ceramic barrel, your hair won’t slide off the rod, making it super easy to create different style curls! Below I am going to show you three different ways to curl your hair using this Remington curling wand: full curls, combo curls, and spiral curls.


Full Curls

This is the way that I usually curl my hair every day. It gives you more of a “Shirley Temple” look, with full, loose curls. To create this look, wrap your hair around the rod, keeping it flat against the barrel the whole way.


Combo Curls

This will give your curls a more textured look. You want to wrap your hair flatly at the top, wrap it around a few times, and then twist your hair the rest of the way around the rod. This will give the curls two different looks that combine for an awesome style.


Spiral Curls

This way will give you a twisted curl look. When creating this look, you want to first twist your hair tightly, spray some hairspray onto it, and then wrap the twisted hair around the curling wand! When you are finished twisting and curling all of your hair, you may think you look a bit scary- the trick is to brush out these curls with your fingers!


There you have it—getting three different curls by using one styling tool! Thanks so much for reading!

Xo Kelsey, www.chasingcinderellablog.com


Thermaluxe™ Dryer

by Remington Ready August 9, 2016


Had enough of frizzy, dried out hair?

It’s time for Thermaluxe!

The Thermaluxe Hair Dryer optimizes heat levels to dry hair quickly without damaging it. The hair-saving heat protection comes from the ceramic-coated grill, which releases tons of negative ions during drying to prevent heat damage and reduce frizz. You’ll love the range of speeds and heat settings that let you find the perfect performance for your hair type. Plus, Thermaluxe reduces styling times with a powerful airflow that dries hair 50% faster than standard Remington dryers. Here’s what else you’ll get with the Thermaluxe Hair Dryer: concentrator and diffuser attachments, cool shot button, tangle-free fabric cord, removable filter, and a 4-year limited warranty.

Stop drying out your hair and start safely drying it with the Thermaluxe Hair Dryer! It’s the perfect styling tool for creating all-day hairstyles that keep up with your nonstop lifestyle.


Sleek Straight Hair Tutorial

by Kim August 1, 2016


Hello everyone! It's Kimberly from the youtube beauty channel, Kimkreations P! Today I am super excited to show you how I get super, sleek, smooth hair using the Remington Thermaluxe Flat Iron! I quickly show you how to go from FRIZZ to CHIC in just 15 minutes (and I have long, long hair, so it might be less time for you!) Enjoy!!


Thermaluxe™ Straightener

by Remington Ready July 22, 2016

 
Want styles that last all day?

You need Thermaluxe™
, the all-new collection from Remington.

The Thermaluxe Straightener is a must have for creating gorgeous, healthy-looking styles that keep up with your nonstop day. It contains 10x more ceramic than previous straighteners, and gets the job done with just one pass. Advanced Thermal Technology optimizes heat levels to prevent damage while quickly transforming hair into the all-day, straightened styles you love! The 1” plates are perfect for detailed styling and the 2” plates are great for straightening larger sections of hair quickly. They both include a floating design that keeps them in constant contact with hair for consistent styles. Other features include: 450° high heat, 15-second heat-up, 30 heat settings, 60-minute auto shutoff, and a 4-year limited warranty.

Get the Thermaluxe straightener and discover hair that lasts through your 24/7 lifestyle.